I have moved to my site to…

I was finally enough self sufficient to register my own domain. Now rest of my journey continues there.

For the blogging engine part, I’ll have to say bye to the WordPress. WordPress was probably the first framework I ever learned, which was after learning how HTML and CSS work.

I have joined the static site generation army for my own personal and career benefits. I am using Hugo as a blogging engine.

On the time of writing this. I have already migrated all the posts, including drafts to Hugo. The site is available at: https://santoshk.dev/

The first post you might want to read is the migration post. It is available at: https://santoshk.dev/posts/2019/switching-to-hugo-this-new-year/

You might find these difficulties as I’m still working on things.

  • No subscription button.

In this case you can burn the RSS feed via FeedBurner.

I know Hugo does not have so many features built in as it is in WordPress. But WordPress must have been in same condition as Hugo is today.

Art is never finished, only abandoned.

Leonardo da Vinci

And there is no exception in relation to software too.

So see you over there! Have a good day.

Run Unit Test Before Every Commit with pre-commit Hook

Why wait for CI/CD services to run your test? And suppose if you’ve submitted a pull request, you’ll have to push another commit to fix the cause of failed unit test. You can prevent that by running unit tests locally before every commit.

Introduction

Why wait for CI/CD services to run your test? And in case you’ve already submitted a pull request, you’ll have to push another commit to fix the cause of failed test held by CI provider. You can prevent that by running unit tests locally before every commit.

I’m building my website using the golang. On every git push, Travis CI runs test and create a docker image and pushes it to DockerHub. My plan is to pull that image every time it is pushed and deploy it to some production server.

Failed Travis build.

One thing I’ve learned about this deployment system is, once I push my repo to GitHub and wait for the image to be pushed to DockerHub. I’m not sure if the test will pass and the image will be pushed. I have to open TravisCI every time I’ve to make sure.

Now I’ll show what workflow I use to to get this done.

Continue reading “Run Unit Test Before Every Commit with pre-commit Hook”

Install Local GitLab Server with Docker

Confirm that an active installation of Docker is installed.

Install inside Docker

docker pull gitlab/gitlab-ce

Start Docker service

sudo systemctl enable --now docker

Add current user to docker user group so that he does not have to use sudo every now and then.

sudo gpasswd -a $USER docker

The following command will start GitLab. Note that –restart always will restart the container at system startup.

sudo docker run --detach \                             
   --hostname gitlab.example.com \
   --publish 443:443 --publish 80:80 --publish 22:22 \
   --name gitlab \
   --restart always \
   --volume /srv/gitlab/config:/etc/gitlab \
   --volume /srv/gitlab/logs:/var/log/gitlab \
   --volume /srv/gitlab/data:/var/opt/gitlab \
   gitlab/gitlab-ce:latest
  • Go to 0.0.0.0

In a future post, I’ll show how to connect it to the LDAP server.

Software Testing and Test Driven Development

Why do we test? Every little software grows big, trying to solve more problem regarding its particular domain. It faces bugs in the way which also needs to be taken care of.

In this post, I’ll show a glimpse of software testing and how test-driven development works in a nutshell.

Why Do We Test?

Every little software grows big, trying to solve more problem regarding its particular domain. It faces bugs in the way which also needs to be taken care of.

As software grows big. It becomes harder to go and test if every part of the software is behaving the way it should. Take the example of a Django application. If the manual path is taken, one is supposed to test every layer of the application, including Model and Views against each if and else in the control flow.

This approach is fine until we have a smaller codebase. But imagine if the codebase inflates, we’ll be spending more time testing than implementing the actual code.

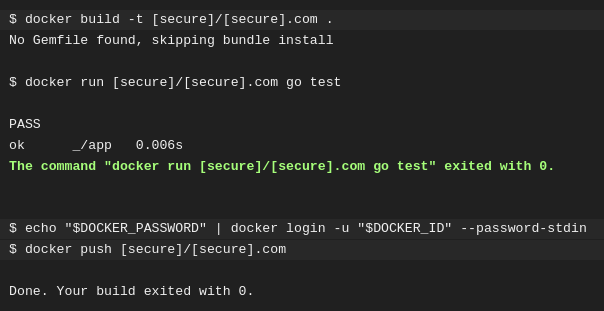
Some developers even tend to first write the test and then write the software logic according to that. Then the software is improved to pass the new tests, only. The process goes like, Add a test > Run test and see if the test fails > Write the code > Run tests > Refactor code > Repeat.

Types of Testing

Now we know how test-driven development works. But the tests are itself classified into multiple variations. There are numerous types, levels, and classifications of tests and testing approaches. The most important automated tests are:

Unit Tests

Verify the functional behavior of individual components, often to class and function level. You give a test case and check if the program the same results every time. This path is so common, major language has some implementation of unittest. Python has inbuilt unittest. JavaScript has their own. Even golang.

Regression Tests

You fix a bug, which unconsciously results in another one. Regression tests are the tests that reproduce historic bugs. Each test is initially run to verify that the bug has been fixed, and then re-run to ensure that it has not been reintroduced following later changes to the code.

Even if you send some project pull request, your patch is most likely will be first going through a test before request is merged into main codebase. If the test fails, maintainer might ask for the changes.

Integration Tests

Verify how groupings of components work when used together. Integration tests are aware of the required interactions between components, but not necessarily of the internal operations of each component. They may cover simple groupings of components through to the whole website.

Code Coverage

When a code is tested. It might or might not go into every conditional branch.

Code coverage is a metric which measures how much test covers the whole codebase. Tests are supposed to go through every each and else condition for a higher code coverage count. Higher is this measure, lower is the chance of encountering undetected software bugs.

Related readings:

Did you like the post? Is something missing? Please let me know in the comments.

Install NVIDIA Drivers on Fedora Without Blacklisting OpenSource Drivers

On Fedora learn how to install NVIDIA drivers in an easy manner. No blacklisting open source drivers, nothing, everything made simple.

This post is an updated form of a video by Egee. Watch is on YouTube.

This video was posted in 2017, and this might have been outdated.

Installing drivers in Linux is a tedious task, unlike Windows.

First of all, make sure secure/fast boot is totally disabled.

We’ll use rpmfusion repositories to add driver packages to system.

Issue this to your console:

sudo dnf install https://download1.rpmfusion.org/free/fedora/rpmfusion-free-release-$(rpm -E %fedora).noarch.rpm https://download1.rpmfusion.org/nonfree/fedora/rpmfusion-nonfree-release-$(rpm -E %fedora).noarch.rpm

Above command will add rpmfusion to your dnf install lookup, because rpmfusion is not there by default.

Now you would actually want to install the drivers by issuing the following command:

sudo dnf install kernel-devel xorg-x11-drv-nvidia akmod-nvidia

Your basic installation is basically complete.

Install cuda libraries if your graphics card supports CUDA.

sudo dnf install xorg-x11-drv-nvidia-cuda

Above method for installing cuda libraries doesn’t work. More information can be found at RPMFusion website. Basically for Fedora 27+, cuda repo needs to be installed. Then install cuda by simply issuing `sudo dnf install cuda`. It’s a ~2GB install.

sudo dnf install http://developer.download.nvidia.com/compute/cuda/repos/fedora27/x86_64/cuda-repo-fedora27-9.2.148-1.x86_64.rpm
sudo dnf install cuda

Media libraries:

sudo dnf install vdpauinfo libva-vdpau-driver libva-utils ffmpeg

You are done. Reboot!